Project Introduction
This project shows you how to build a fun, cheap and reusable rocket that makes a great prop for airsoft games, an exciting party discussion item or school project. Soda (or pop) bottle rockets provide an all around “blast” of a time.
The pop bottle rocket has been around for quite a while now. Youtube is chock full of folks showing off their pop bottle rockets. Some of the videos are impressive, while most are pretty lame. The pop bottle rocket is powered by compressed air and water. It contains no flammable or dangerous materials. In some circles, these rockets are known as “water bottle rockets” or “soda pop bottle rockets”.
The rocket design presented in this project shows how to build a high-performance pop bottle rocket that can be used during an Airsoft game such as a Mil-Sim event.
Existing water bottle rocket designs are unstable…this one is not.
There are quite a few videos on youtube showing various rocket designs. Most of the videos show rockets which are extremely unstable in flight. The majority of the rockets are shown to be shooting straight up into the air 50 to 100 feet and then falling straight back down to the ground. In many of the videos, we see the rocket taking off from the launcher and spinning out of control.
These types of rockets are not usable during an Airsoft game since they are not reliable and not stable in flight.
The rocket design presented in this project solves all of these problems and provides the Airsoft team or hobbyist with a highly stable, targetable and reliable water bottle rocket with ballistic flight characteristics.
Introducing a target-able Airsoft battlefield water bottle rocket
In this project we present a new design for a pop bottle rocket which provides predictable ballistic characteristics. The stability of the rocket design presented here allows the rocket to be used as a tactical battlefield Airsoft “weapon”. The rocket has an effective range of 75 feet to 350 feet from the launcher, with a repeatable targeting accuracy of approximately 50 feet. This means that you can reliably launch the rocket at a target 300 feet away and expect the rocket to land within 50 feet of the target.
What you will need
Rocket parts:
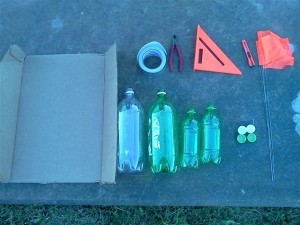
- 1 2-liter soda pop bottle with smooth, straight sides. The best bottles are those used by the Shasta and Pepsi brands because these bottles do not taper inward at the middle. The image below shows 2 2-liter bottles, but for this project, you only need 1 2-liter bottle.
- 2 20-Ounce soda pop bottle with smooth, straight sides. Like the 2-liter bottle, the best brand is Pepsi or Shasta since they have straight sides.
- 1 12-inch x 12-inch sheet of cardboard
- 4 stiff wires such as hangers or sprinkler flags for stabilizing the fins
- 1 roll of 2-inch aluminum ducting tape. You do not want “duck-tape”, rather, you are looking for aluminum ducting tape which can be found at a local home improvement store such as Home Depot or Lowes in the HVAC section.
- Razor-knife or scissors for cutting the cardboard fins
- Wire cutters for cutting the stiff wires (hangers or sprinkler flags)
- Pliers for bending the fin stabilizing wires
- Straight-edge, ruler or angle-edge for making straight, 45-degree fins
- 2′ section of 1/2″ PVC
- 1 1/2″ PVC T fitting
- 2 1/2″ PVC end caps
- 1 1/4″ quick release air compressor connector
- Some pipe tape
- General purpose PVC cement
Construction steps
Rocket Assembly
- Remove all wrappers from the soda pop bottles
- Clean and dry the bottles
- Cut 4 stabilizer fins from the cardboard. The fins should equilateral triangles that are 6″ per side.
- Tape the first fin on to the side of the 2-liter bottle
- Apply a length of tape to one side of the fin
- Carefully place the fin along the side of the bottle, making sure that it is perfectly straight and parallel to the bottle.
- Press the tape down on the bottle and make a tight fit all along the fin
- Fold the fin backward (toward the taped side) and apply a second length of tape to the fin and the bottle, pressing down so that the fin and the bottle well secured to one another
- Both sides of the fin should now have tape along their full length
- Tape the second fin exactly across from the first fin, making sure that they are straight and perfectly aligned with one another
- Attach the third fin to the bottle exactly between the first two fins, making sure that the third fin is perfectly parallel along the length of the bottle
- Attach the forth and final fin to the bottle exactly across from the third fin, again taking care that it is parallel.
- You should now have all 4 fins attached to the bottle. Verify that they are straight and in the correct locations. Fix any problems before proceeding.
- With the finned bottle opening pointed down, take one of the small, 20 oz bottles and set it’s base into the base (now the top) of the large 2-liter bottle. The “feet” should interlock with each-other.
- Using the tape, attach the small bottle to the large bottle. Tape all around the joint so that it is strong and straight.
- Cut the base off of the second 20 oz bottle just above the “feet”.
- Pressure fit the second 20 oz bottle onto the top of the 20 oz bottle that is already attached to the rocket base.
- Tape the second bottle to the rocket.
- Starting with one of the stiff wires, cut it so that it is long enough to mount between two adjacent fins. The goal is to use the wire to keep the fins at a 90 degree angle from each other.
- Bend the ends of the wire enough that they lay flat against each fin when the wire is placed between the two adjacent fins.
- Tape the wire to each of the two fins.
- This will make the rocket fly stable and the fins more sturdy when the rocket lands.
Launcher assembly
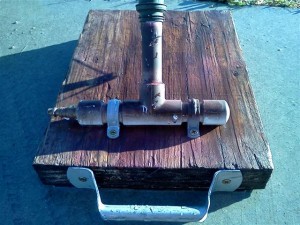
The launcher is built out of 1/2″ pvc pipe formed into a T. You will need the following parts to build the PVC launch assembly:
Now that you are working with the PVC launch system, remember to take your time, measure twice and cut once. Always test fit the PVC parts prior to gluing them together. When working with PVC, it is wise to “de-bur” the parts after cutting them. De-burring is the process of cutting off the little PVC dingle-berries that seems to stick tot he end of a cut PVC pipe. In short, clean your PVC cut before putting the pieces together.
The 1/2″ PVC pipe should slide snugly into the 2-liter bottle. To seal the bottle to the pipe, we will make use of a friction seal, where the pipe is slighted bulged about 4″ from the lower end. The friction air seal allows pressure to build in the bottle as it is being filled with compressed air.
- Cut the 2′ long piece of PVC so that it extends 5″ out of the bottom of the 2-liter bottle
- With a candle, slowly heat the PVC pipe about 4″ from one end.
- Avoid burning the pipe by keeping it out of direct contact with the flame
- Rotate the pipe along its long axis so that the PVC becomes soft a pliable in a ring shape
- Keep rotating the PVC pipe so that it does not become discolored
- Push the two ends of the pipe together so that a bulge is created along the softened ring of hot PVC
- Carefully form the bulge so that it has a height above the pipe of about 2 millimeters (no more than 1/8″)
- The bulge should have sides that gently slope down to the original diameter of the pipe
- Make sure that the bulge is even in height all the way around the pipe
- Remove the pipe from the heat source and allow to cool
- Cut 2 3″ sections of the remaining 1/2″ pipe
- Glue one end cap onto each piece
- Glue both pieces into the T
- Glue the launch tube (with the friction seal toward the T) into the T
- Drill a hole into 1 of the end caps using a bit which is the same size as the 1/4″ threaded quick-release
- Be sure that the bit is the size of the threaded end without the threads
- Do not use a bit the same size as the threads or you will not be able to screw in the quick release
- Apply pipe tape to the quick release threads
- Screw the quick release into the end cap
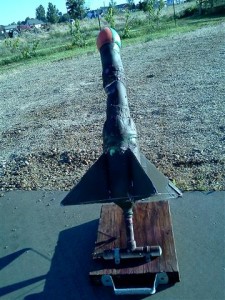
- Invert the T and attach it to a sturdy wood base using PVC electrical pipe brackets and wood screws
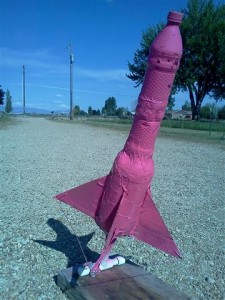
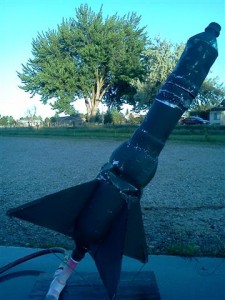
- See the photo’s below…
Launching the rocket
This is the fun part and after building and flying 4 rockets, it still doesn’t get old.
- Fill the 2-liter bottle with water to about 1/4 full
- Quickly turn the rocket right side up and insert the launch tube
- Press the rocket down onto the friction seal snugly
- Attach a depressurized air compressor hose to the quick release
- Make sure that NO ONE is in front of the rocket
- It would also be wise to keep a safe distance from the launch pad in case of a catastrophic launcher, PVC or rocket failure
- Apply air pressure slowly
- Depending on the tightness of your friction seal, the rocket may take off anywhere between 25 and 125 PSI of air pressure
- When the force of the air pressure exceeds the force of the friction seal, the rocket will blast off!
- You will be amazed, your friends will think you are awesome and your neighbors will fear you
- Depending on the pressure and the care taken when you built the rocket, you should expect to see the rocket fly anywhere between 150 and 350 feet in distance and 100 feet into the air
Photo’s
Pop bottle rocket resources
If you don’t want to build the rocket yourself, or are looking for some other water bottle related projects take a look at these products…
