Raspberry Pi B+ Video Jack
I just received the new Raspberry Pi B+ from Canakit. Wow, what a great upgrade to the Raspberry Pi model B! As I was preparing to install NOOBS on my new Pi, I noticed that the analog video output is no longer a nice RCA connector, but has been integrated into the 3.5mm TRRS jack, along with the stereo audio signal.
Argh it’s TRRS!!!
TRRS is short for Tip-Ring-Ring-Sleeve
The TRRS jack is wired as follows:
- Tip – Audio Left
- Ring – Audio Right
- Ring – Ground
- Sleeve – Video (NTSC or PAL)
Unfortunately, I don’t have a TRRS to RCA adapter cable and I don’t have a TV with HDMI input. I really want to get my new Pi up and running!
Time to get a little funky with the Pi and start poking around.
Proceed at your own risk
Everything beyond this point in the article can damage your Pi if you are not careful. You should not attempt this hack (even though it is simple) unless you are comfortable with a bolt, a pin and a couple of jumper wires. If you are not careful, you might short out your Pi doing this… In short, if you are not comfortable with this, do not do it! By proceeding you understand and accept all risks that may or may not be discussed in this article.
You can order a nice Apple adapter cable from Amazon.
All of that warning stuff aside, this is about the simplest hardware hack you might ever do…
The easiest hardware hack ever…
To get the analog video signal, you will need the following parts:
- Small “machine” bolt that is just a little smaller than the TRRS jack
- Small tailor pin (the little metal, super-sharp kind)
- An RCA video cable (Yellow)
- 2 alligator jumper wires (or you can just strip the wire ends and wrap them around the bolt and the pin)
Basically, you are going to bypass that crazy TRRS jack by connecting directly to the desired analog video signal and ground.
Steps:
- Disconnect all power from the Pi
- Open the Pi case so that you can see the top of the jack. No case, no problem, just be able to access the TRRS jack.
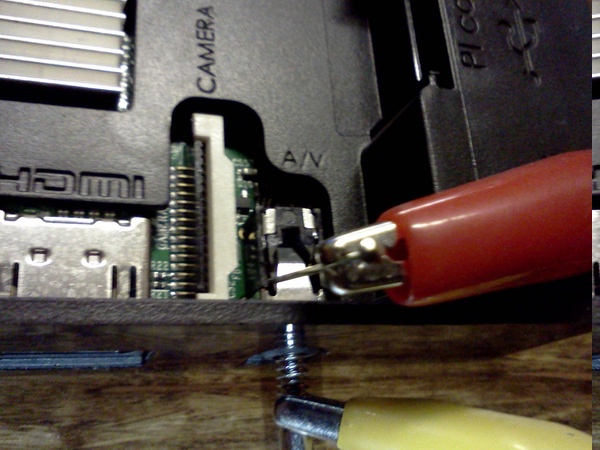
- Screw the machine bolt into the jack opening just far enough to make contact with the first connector in the jack. This first connector is the sleeve connection and contains the video signal. The machine bolt should only need to go into the jack 2-3mm, not very far at all. The machine bolt should be small enough to enter the hole of the jack without damaging the plastic sides of the jack.
- Poke the steel pin between the left side metal leaf and the black plastic of the jack.
- Using one of your alligator jumper wires, connect the video signal pin (center pin) on your yellow RCA video cable to the machine bolt
- Connect the other alligator jumper wire to the shield of the yellow RCA video cable
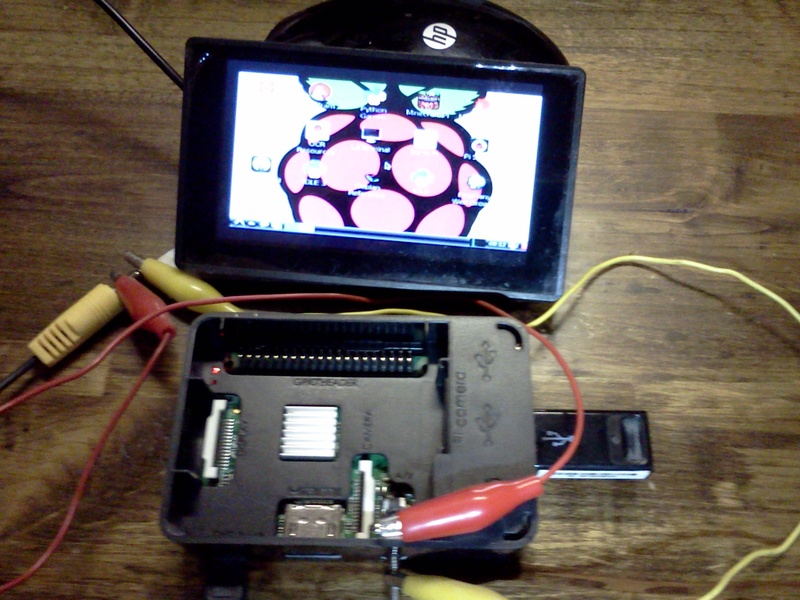
- Turn on your TV
- Ensure that the bolt and pin are connected to the correct contact points and that there are no other electrical connections on or around the TRRS jack.
- Power up your Pi
- Press the 4 key on your keyboard for NTSC or 3 for PAL, depending on your TV.
- Viola! You should see the Pi’s screen!
The pin and machine bolt connected to the TRRS jack…
The analog video from the bypassed TRRS jack on a mini video screen
[sp# feedList=RaspberryPi showImages=true truncateTitleAtWord=Newly]