Introduction
This project illustrates how to connect a PC to a small FRS radio via a simple RS-232 interface. There are several reasons that you may want to be able to control your FRS radio from your PC. In this case, the FRS radio is acting as an internet gateway to connect one or more FRS radios together via the internet using the Interpeater software.
Precautions
This project requires various skills including soldering, circuit building, hardware dis-assembly, digital debugging and such. If you do not know what you are doing, you should not try this project.
- This project involves opening the case of your radio and soldering wires to the microprocessor’s surface mount leads. This will likely void your warranty and may also destroy your radio. You are responsible for any modifications to your radio.
- This project involves connecting your PC RS-232 port to your radio via a simple interface. This may result in the destruction of your PC, Radio, interface circuitry or other devices. You are responsible for any devices that you connect to your PC.
Since all PC’s and Radio’s may be different, you should fully understand your equipment before trying this project.
You assume all risk for any modifications that you make to your PC or Radio.
The Uniden EcoTrek FRS Radio
This radio was the first radio that I interfaced to the Interpeater system. The Interpeater is a pure java, internet based radio repeater for Ham Radio or FRS radio use that allows you to use the internet via VOIP to extend the range of your handheld radio.
While the Uniden EcoTrek FRS radio is abit dated, you can still purchase uniden FRS radios from Amazon.com:
I could have chosen to use a real Ham Radio (i.e. a small “handy-talky” aka HT), but the risk of ruining the HT was more than I was willing to bear for this project. The main advantage of using this radio is that it was very cheap and relatively simple! If I ended up destroying it, I was out only $9.95 US. Not bad.
The RS-232 serial interface cost less than $5.00US, so it was pretty cheap too.
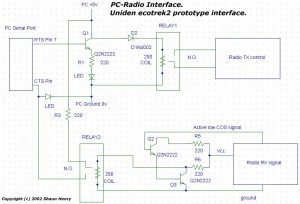
This circuit is pretty simple, you can use the transmit control part of it for any radio that needs a dry closure to enable transmission. You may have to monkey with the receive control circuit if your radio does not use active low signaling for it’s COS or other squelching system.
The interface detects that the radio is receiving when the voltage on the CTS pin goes high (+5v PC). Notice that the radio and PC are electrically isolated from one another.
Circuit Schematic…

Prototype RS-232 serial interface
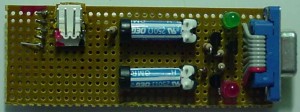
The interface implemented on a perfboard…

Note the hack of a 4-pin header on the far left. We are looking straight down on it, so you can’t see the “pins”.
The green light illuminates when the radio is receiving and the red light illuminates when it is transmitting.
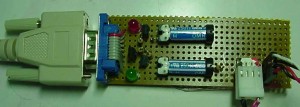
The interface connected to a serial cable, PC power cable and radio wires…

Connecting the serial interface to your PC
If you have an older PC or laptop, connecting the interface to your PC is easy. Just use a standard 9 pin RS-232 cable or plug the interface directly into the serial port on the PC.
If, like most of us, you have a newer USB-only PC without the RS-232 serial port, you will need a USB to serial converter. I have tried several of these units with varying degrees of success. Overall, the best unit I have tried is the BAFO-BF-810. I ordered mine from Amazon.com about 3 years ago and have had no problems with it.
“Hacking” the Radio
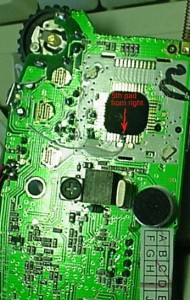
Where to get the COS signal…

Open up the radio and remove the LCD screen. Under the LCD, you will find the microprocessor. Locate the 5th pad from the right on the lower row of pads. This is the COS pad. Note that the COS signal on this radio is active low. That means that when the radio is receiving, the voltage on the COS pad is near 0v. This is why I needed to invert the signal in the interface.
Overall, the Uniden EcoTrek FRS radio is a well designed and robust little unit. For the price, it can’t be beat. If you are looking for a cheap way to learn about electronics, radio’s and PC interfacing, then this is definitely the radio for you.
Copyright (c) 2002-2009 HenryRanch LLC.
[sp# feedList=FRS include=radio showImages=true]